In online applications, toast notifications are a popular user interface feature that’s used to give users feedback.
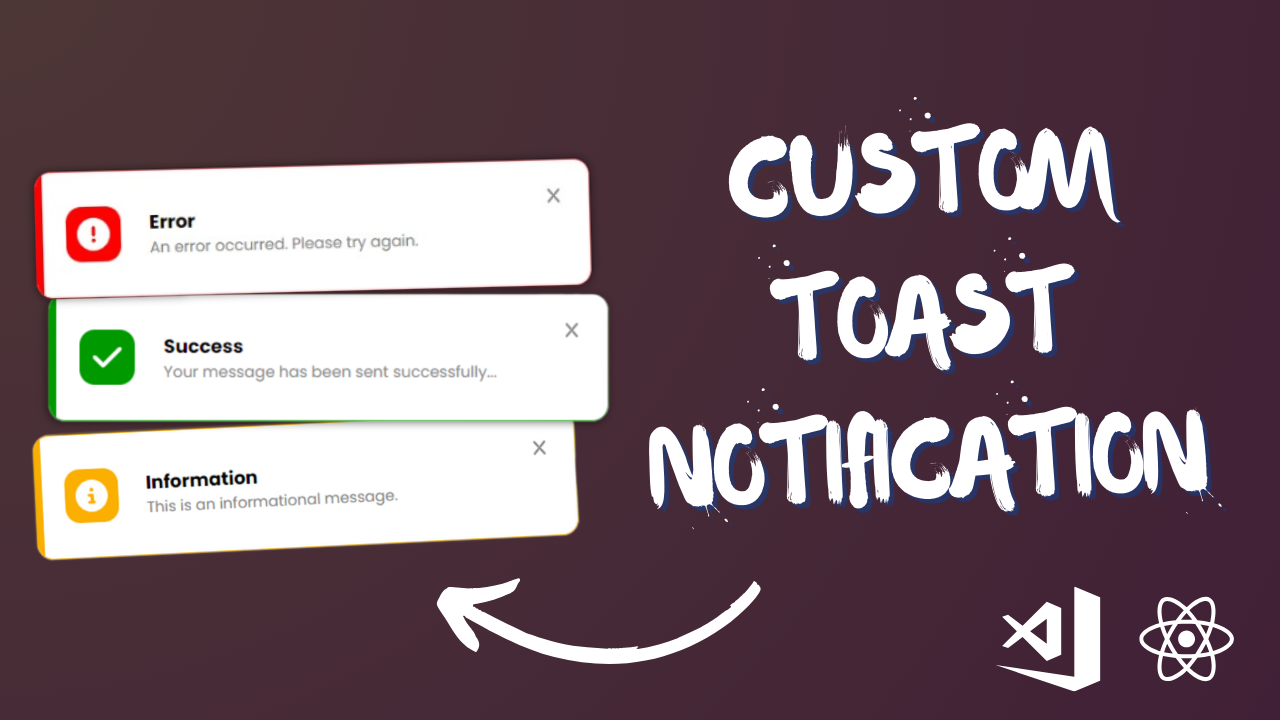
This article will demonstrate how to create a personalized toast notification component in React, replete with a beautiful CSS design. With matching icons and colors, the component lets you show success, informative, or error messages.
Component for React Toast Notification
Let’s look at the ToastNotification component first. This React component takes in multiple props, including the open, onClose, duration (which defaults to 1500 milliseconds), and variation (which defaults to’success’).
// ToastNotification.js
import React, { useState, useEffect } from 'react';
import './toastnotification.css';
import { FontAwesomeIcon } from '@fortawesome/react-fontawesome';
import {
  faCheck,
  faX,
  faInfoCircle,
  faExclamationCircle,
} from '@fortawesome/free-solid-svg-icons';

function ToastNotification({
  variant = 'success',
  duration = 1500,
  open,
  onClose,
}) {
  // State variables
  const [isActive, setIsActive] = useState(false);
  const [icon, setIcon] = useState(faCheck);
  const [color, setColor] = useState('green');

  // Messages for different variants
  const toastMessages = {
    success: 'Your message has been sent successfully...',
    information: 'This is an informational message.',
    error: 'An error occurred. Please try again.',
  };

  // Function to handle click and close the toast
  function handleClick() {
    setIsActive(false);
    onClose(false);
  }

  // Effect to set icon and color based on the variant
  useEffect(() => {
    switch (variant) {
      case 'information':
        setIcon(faInfoCircle);
        setColor('orange');
        break;
      case 'error':
        setIcon(faExclamationCircle);
        setColor('red');
        break;
      default:
        setIcon(faCheck);
        setColor('green');
    }
  }, [variant]);

  // Effect to control the visibility of the toast
  useEffect(() => {
    setIsActive(open);
  }, [open]);

  // Effect to automatically close the toast after a specified duration
  useEffect(() => {
    const timer = setTimeout(() => {
      onClose(false);
      setIsActive(false);
    }, duration);

    return () => {
      clearTimeout(timer);
    };
  }, [onClose, duration]);

  // JSX structure for the toast notification
  return (
    <div
      style={{ '--mainColor': color }}
      className={`toastContainer ${isActive ? 'active' : ''}`}
    >
      <div className="icon" style={{ backgroundColor: color }}>
        <FontAwesomeIcon icon={icon} />
      </div>
      <div className="message">
        <span className="head">
          {variant?.charAt(0).toUpperCase() + variant?.slice(1)}
        </span>
        <span className="saved">{toastMessages[variant]}</span>
      </div>
      <FontAwesomeIcon onClick={handleClick} className="closeBtn" icon={faX} />
    </div>
  );
}

export default ToastNotification;
CSS Styling
The CSS file (toastnotification.css) provides the styling for our toast component. It includes definitions for the toast container, message content, icons, and close button. The CSS also features transitions and hover effects for a smooth user experience.
@import url('https://fonts.googleapis.com/css2?family=Poppins:wght@300;400;500;600;700&display=swap');

:root{
    --mainColor:rgb(104, 164, 0);
}


.toastContainer{
    background: white;
    width:  450px;
    margin: 40px;

    display: flex;
    padding: 27px;
    height: 60px;
    border-radius: 15px;
    align-items: center;
    left: 0%;
    position: absolute;
    /* box-shadow: 0px 3px 10px rgb(0, 0, 0,0.3); */
    gap: 26px;
    transition: all 0.2s cubic-bezier(0.68, -0.55, 0.265, 1.35);
    border: 0.5px solid var(--mainColor);
    overflow: hidden;
    font-family: 'Poppins', sans-serif;
    /* transform: scale(0); */

}

.toastContainer.active{
    left: 60%;
}


.toastContainer::before{
    content: '';
    height: 100%;
    width: 6px;
    background: var(--mainColor);
    position: absolute;
    left: 0px;

}


.toastContainer .message{
    display: flex;
    flex-direction: column;

}

.toastContainer .message .head{
    font-weight: 700;
    font-size: 17px;
}

.toastContainer .message .saved{
    color: gray;
    font-size: 14px;
    font-weight: 400;
}


.toastContainer .icon {
    font-size: 25px;
    background: var(--mainColor);
    padding: 10px;
    border-radius: 14px;
    width: 30px;
    height: 30px;

    color: white;
    font-size: 30px;
    display: flex;
    justify-content: center;
    align-items: center;

}


.toastContainer .closeBtn{
    color: gray;
    position: absolute;
    top: 15px;
    right: 15px;
    width: 15px;
    height: 15px;
    font-size: 28px;
    cursor: pointer;
    padding: 10px;
    border-radius: 50%;
    transition: 0.6s all;
}

.toastContainer .closeBtn:hover{
    background-color: rgb(237, 237, 237);
}


.showToast{
    width: 300px;
    height: 55px;
    border-radius: 7px;
    background: rgb(71, 71, 71);
    color: white;
    font-size: 15px;
    box-shadow: 0 5px 5px rgb(0, 0, 0,0.1);
    border: none;
    cursor: pointer;
    opacity: 0.9;
    position: absolute;
    top: 50%;
    left: 34%;

}
Using the Component
Now that we have our custom toast notification component, let’s see how we can use it in a React application (App.js).
// App.js
import React, { useState } from 'react';
import ToastNotification from './ToastNotification';

function App() {
  // State for controlling the visibility of the toast
  const [toastOpen, setToastOpen] = useState(false);

  // Function to open the toast
  const showToast = () => {
    setToastOpen(true);

    // Close the toast after 3 seconds (3000 milliseconds)
    setTimeout(() => {
      setToastOpen(false);
    }, 3000);
  };

  return (
    <div>
      {/* Button to trigger the toast */}
      <button className="showToast" onClick={showToast}>
        Show Toast
      </button>

      {/* ToastNotification component */}
      <ToastNotification
        variant="success"
        duration={3000}
        open={toastOpen}
        onClose={(isOpen) => setToastOpen(isOpen)}
      />
    </div>
  );
}

export default App;
In this example, pressing the “Show Toast” button causes the toast notice to appear and sets the toastOpen state to true, causing the showToast function to be triggered. The toast can be closed using the onClose callback after a predetermined amount of time.
Through the integration of this personalized toast notification element into your React application, you can offer users aesthetically pleasing and enlightening feedback in multiple contexts. Please feel free to further modify the styles and behavior to better fit the demands of your project.


