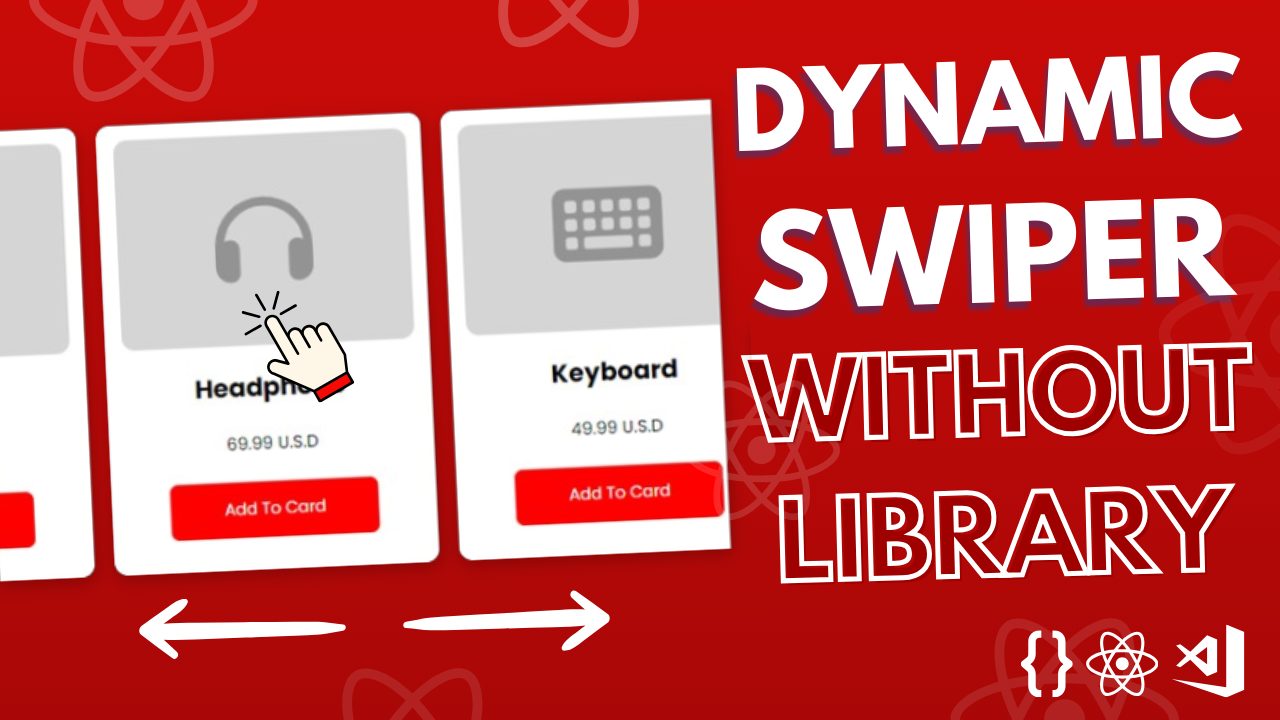
We’ll go through how to create a swiper component in React that enables horizontal item scrolling in this tutorial. Additionally, we’re going to provide arrow buttons for swiper navigation. Here’s a step-by-step guide to doing it.
Required conditions:
Verify that the following are installed:
- Npm (Node Package Manager) with Node.js
- Basic understanding of CSS and React
Establishing the Project
Let’s start by establishing our React project. Launch a terminal window and type the following commands:
npx create-react-app swiper-demo
cd swiper-demo
npm install @fortawesome/fontawesome-svg-core @fortawesome/free-solid-svg-icons @fortawesome/react-fontawesome
Creating the Swiper Component
Now, let’s create our swiper component. Create a new file named Swiper.js inside the src directory and paste the following code:
import React, { useState, useRef, useEffect } from 'react';
import './swiper.css';
import { FontAwesomeIcon } from '@fortawesome/react-fontawesome';
import { faArrowLeft, faArrowRight } from '@fortawesome/free-solid-svg-icons';

function Swiper({ children, showArrowsProp }) {
  const [startX, setStartX] = useState(0);
  const [isMouseDown, setIsMouseDown] = useState(false);
  const [scrollLeft, setScrollLeft] = useState(0);
  const [showArrows, setShowArrows] = useState(false);

  const swiperRef = useRef(null);

  useEffect(() => {
    setShowArrows(showArrowsProp);
  }, [showArrowsProp]);

  function handleOnMouseDown(event) {
    setStartX(event.clientX);
    setIsMouseDown(true);
  }

  function handleOnMouseMove(event) {
    if (!isMouseDown || !swiperRef.current) return;
    event.preventDefault();
    const deltaX = (event.clientX - startX) * 0.115;
    swiperRef.current.scrollLeft = scrollLeft - deltaX;
  }

  function handleOnMouseUp() {
    setIsMouseDown(false);
  }

  function handleOnScroll() {
    setScrollLeft(swiperRef.current.scrollLeft);
  }

  return (
    <div style={{ position: 'relative' }}>
      {showArrows && (
        <>
          <div
            className="leftArrow"
            onClick={() => {
              swiperRef.current.scrollLeft -= 100;
            }}
          >
            <FontAwesomeIcon icon={faArrowLeft} />
          </div>
          <div
            onClick={() => {
              swiperRef.current.scrollLeft += 100;
            }}
            className="RightArrow"
          >
            <FontAwesomeIcon icon={faArrowRight} />
          </div>
        </>
      )}

      <div
        onMouseDown={(event) => {
          handleOnMouseDown(event);
        }}
        onMouseMove={(event) => {
          handleOnMouseMove(event);
        }}
        onMouseUp={() => {
          handleOnMouseUp();
        }}
        onScroll={() => {
          handleOnScroll();
        }}
        ref={swiperRef}
        className="swiperRootContainer"
      >
        <div className="swiperItemsContainer">
          {React.Children.map(children, (child, index) => (
            <div key={index} className="swiperItem">
              {child}
            </div>
          ))}
        </div>
      </div>
    </div>
  );
}

export default Swiper;
Creating the CSS Styles
Next, create a new file named swiper.css inside the src directory and paste the following CSS code:
.swiperRootContainer {
  width: 900px;
  height: 600px;
  overflow-x: hidden;
  border-radius: 10px;
  display: flex;
  align-items: center;
}

.swiperItemsContainer {
  margin-left: 9px;
  display: flex;
  height: 90%;
  width: max-content;
}

.swiperItem {
  width: 400px;
  background-color: white;
  border-radius: 10px;
  margin: 12px;
  display: flex;
  align-items: center;
  justify-content: center;
  font-size: 30px;
}

.leftArrow,
.RightArrow {
  position: absolute;
  background-color: white;
  top: 49%;
  padding: 20px;
  cursor: pointer;
  font-size: 26px;
  border-radius: 15px;
}

.leftArrow {
  left: -100px;
}

.RightArrow {
  right: -100px;
}

.swiperRootContainer::-webkit-scrollbar {
  display: none;
}
Integrating the Swiper Component
Now, let’s integrate our swiper component into the App.js file. Replace the contents of App.js with the following code:
import './App.css';

import Swiper from './Swiper/Swiper';
import ProductForm from './ProductForm/ProductForm';
import {
  faShirt,
  faKeyboard,
  faHeadphones,
  faGlasses,
  faLaptop,
} from '@fortawesome/free-solid-svg-icons';

function App() {
  const products = [
    { id: 1, name: 'Shirt', price: '19.99', image: faShirt },
    { id: 2, name: 'Headphone', price: '69.99', image: faHeadphones },
    { id: 3, name: 'Keyboard', price: '49.99', image: faKeyboard },
    { id: 4, name: 'Glasses', price: '89.99', image: faGlasses },
    { id: 5, name: 'Laptop', price: '678.00', image: faLaptop },
  ];
  return (
    <div className="App">
      <Swiper showArrowsProp={true}>
        {products.map((product, index) => (
          <ProductForm product={product} />
        ))}
      </Swiper>
    </div>
  );
}

export default App;
So in our Swiper component, we are using children’s elements to render them inside the component itself, because this will give us the capacity to use customized components inside the Swiper component.
So, how this is working? I create a ProductForm component and put it inside the component Swiper by using an array of items with different proprieties.
So we map through each item and pass the information inside the ProductForm to render the object, and depending on how many items we created, the ProductForm is going to be used inside the Swiper functional component.
As we did for the Swiper.js, create a folder call it ProductForm, and inside it create two files: ProductForm.js and productform.css
import React from 'react';
import './productform.css';
import { FontAwesomeIcon } from '@fortawesome/react-fontawesome';

function ProductForm({ product }) {
  return (
    <div className="productFormRoot">
      <div className="productImageContainer">
        <FontAwesomeIcon className="faIcon" icon={product?.image} />
      </div>
      <div className="productInfoContainer">
        <div className="productTitle">{product?.name}</div>
        <div className="productPrice">{product?.price} U.S.D</div>
        <div className="addToCardBtn">Add To Card</div>
      </div>
    </div>
  );
}

export default ProductForm;
and here’s the productform.css for the css styling:
@import url('https://fonts.googleapis.com/css2?family=Poppins:ital,wght@0,100;0,200;0,300;0,400;0,500;0,600;0,700;0,800;0,900;1,100;1,200;1,300;1,400;1,500;1,600;1,700;1,800;1,900&display=swap');


.productFormRoot{
    width: 100%;
    height: 100%;
    padding: 20px;
    background-color: white;
    border-radius: 16px;
    font-family: "Poppins", sans-serif;
    user-select: none;

}

.productImageContainer{
    background-color: rgb(213, 213, 213);
    height: 50%;
    margin-bottom: 30px;
    border-radius: 16px;
    display: flex;
    justify-content: center;
    align-items: center;

}

.faIcon{
    font-size: 120px;
    color: rgb(147, 147, 147);
}
.productInfoContainer{
    display: flex;
    justify-content: center;
    align-items: center;
    flex-direction: column;
    gap: 30px;
}

.productTitle{
    font-size: 31px;
    font-weight: bold;
}

.productPrice{
    font-size: 21px;
}

.addToCardBtn{
    /* border: 1px solid gray; */
    font-size: 20px;
    padding: 20px;
    border-radius: 10px;
    background-color: red;
    color: white;
    width: 60%;
    text-align: center;
    cursor: pointer;
    transition: 0.3s all;

}

.addToCardBtn:hover{
    background-color: rgb(215, 0, 0);
}
Conclusion:
In this simple project, we learned a lot of things from creating a swiper.
First, now we know how to use the onMouse event handlers and build the logic on how to move the elements left or right, and we learned a very concept of how to use children objects inside our custom components, and finally how to create a product card that we used as a demo to make this swiper functional. So, I hope you learned from this project and got some value from it.


